
목차
-
🦴 User Microservice 를 API Gateway에 등록
-
▶ 연동을 위해 application.yml 파일에 등록
-
🦴 User Microservice 기능 추가(사용자 조회와 정보, 주문 내역 조회)
-
▶ 전달 객체
-
▶ Controller
-
▶ Service 와 ServiceImpl
-
▶ Repository
-
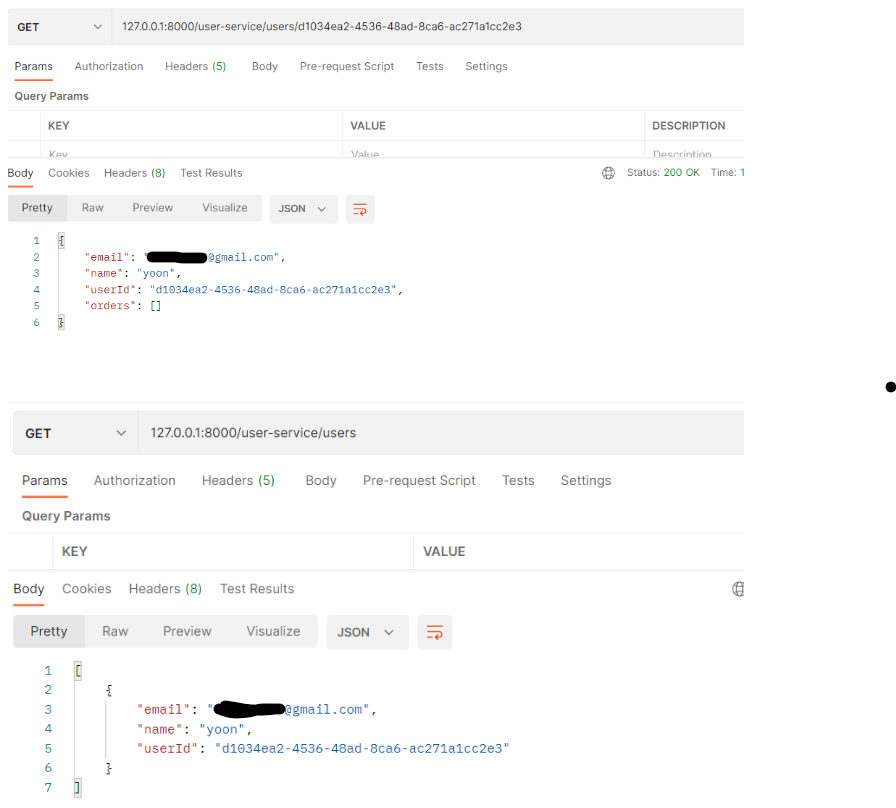
▶ 결과
-
🦴 Catalog Microservice 제작
-
▶ 전달 객체
-
▶ Controller
-
▶ Service 와 ServiceImpl
-
▶ Repository
-
▶ 데이터 미리 넣기
-
🦴 Order Microservice 제작
-
▶ 전달 객체
-
▶ Controller
-
▶ Service 와 ServiceImpl
-
▶ Repository
-
🦴 모든 서비스 등록
🦴 User Microservice 를 API Gateway에 등록
▶ 연동을 위해 application.yml 파일에 등록
routes:
  - id: user-service
    uri: lb://USER-SERVICE
    predicates:
      - Path=/user-service/**
🦴 User Microservice 기능 추가(사용자 조회와 정보, 주문 내역 조회)

- 전체 사용자를 조회 할땐 현재 서비스에 가입된 회원 전체를 나타낸다
- 사용자의 Id를 통해 회원을 보려고 한다면 회원의 정보와 회원이 주문한 내역까지 함께 나타낸다.
▶ 전달 객체
1. ResponseUser
@Data
@JsonInclude(JsonInclude.Include.NON_NULL)
public class ResponseUser {
    private String email;
    private String name;
    private String userId;
    private List<ResponseOrder> orders;
}- @JsonInclude(JsonInclude.Include.NON_NULL) : 불필요한 값인 null 인 데이터는 버리고 전달한다.
- List<ResponseOrder> 를 통해서 사용자가 주문한 정보도 가져올 수 있게 데이터를 추가했다.
2. ResponseOrder
@Data
public class ResponseOrder {
    private String productId;
    private Integer qty;
    private Integer unitPrice;
    private Integer totalPrice;
    private LocalDateTime createdAt;

    private String orderId;
}- 주문의 데이터중 어떤 데이터를 넣어줄지 ResponseOrder를 통해 설정했다.
3. UserDto
@Data
public class UserDto {
    private String email;
    private String name;
    private String pwd;
    private String userId;
    private Date createdAt;

    private String encryptedPwd;

    private List<ResponseOrder> orders = new ArrayList<>();
}- 데이터 전달 객체인 DTO에도 order를 넣어줄 수 있다.
▶ Controller
    @GetMapping("/users")
    public ResponseEntity<List<ResponseUser>> getUsers() {
        Iterable<UserEntity> userList = userService.getUserByAll();

        List<ResponseUser> result = new ArrayList<>();
        userList.forEach(v -> {
            result.add(new ModelMapper().map(v, ResponseUser.class));
        });

        return ResponseEntity.status(HttpStatus.OK).body(result);
    }

    @GetMapping("/users/{userId}")
    public ResponseEntity<ResponseUser> getUser(@PathVariable("userId")String userId) {
        UserDto user = userService.getUserByUserId(userId);

        ResponseUser returnValue = new ModelMapper().map(user, ResponseUser.class);

        return ResponseEntity.status(HttpStatus.OK).body(returnValue);
}- 처음 메소드는 저장되어 있는 사용자의 정보를 모두 나타내는 것이다
- JsonInclude로 user의 데이터에는 order의 정보가 없기 때문에 알아서null 인 값을 포함하지 않고 데이터를 내보낸다
- 두번쨰 메소드는 PathVariable을 통해 들어온 값을 확인해 해당 회원의 내용을 주문 정보까지 모두 나타낸다.
▶ Service 와 ServiceImpl
1. Service
public interface UserService {
    UserDto create(UserDto userDto);
    List<UserEntity> getUserByAll();
    UserDto getUserByUserId(String userId);
}2. ServiceImpl
@Service
@RequiredArgsConstructor
public class UserServiceImpl implements UserService {

    private final UserRepository userRepository;
    private final BCryptPasswordEncoder passwordEncoder;

    ...
    @Override
    public List<UserEntity> getUserByAll() {
        return userRepository.findAll();
    }

    @Override
    public UserDto getUserByUserId(String userId) {
        UserEntity userEntity = userRepository.findByUserId(userId)
                .orElseThrow(() -> new UsernameNotFoundException("USer not found"));

        UserDto userDto = new ModelMapper().map(userEntity, UserDto.class);
        List<ResponseOrder> orderList = new ArrayList<>();
        userDto.setOrders(orderList);

        return userDto;
    }
}- getUserByAll() 은 사용자의 모든 데이터를 가져오기 때문에 List 형식으로 반환한다.
- getUserByUserId() 는 사용자의 정확한 Id로 데이터를 가져오고 현재는 존재하지 않지만 주문 내역을 가져와 저장하는 것을 보여준다.
▶ Repository
public interface UserRepository extends CrudRepository<UserEntity, Long> {
    UserEntity findByUserId(String userId);
}
▶ 결과
🦴 Catalog Microservice 제작
- 라이브러리는 User 와 동일합니다
- yml 파일을 User 와 동일하게 설정해줍니다
- 해당 서비스는 상품의 목록만 전달합니다. 이미 등록되어있다는 전제로 서비스가 진행됩니다.
▶ 전달 객체
1. CatalogEntity
@Data
@Entity
@Table(name = "catalog")
public class CatalogEntity implements Serializable {

    @Id
    @GeneratedValue(strategy = GenerationType.IDENTITY)
    private Long id;

    @Column(nullable = false, length = 120, unique = true)
    private String productId;
    @Column(nullable = false)
    private String productName;
    @Column(nullable = false)
    private Integer stock;
    @Column(nullable = false)
    private Integer unitPrice;

    @Column(nullable = false, updatable = false, insertable = false)
    @ColumnDefault(value = "CURRENT_TIMESTAMP")
    private Date createdAt;

}- @ColumnDefault를 통해 H2 DB에서 현재시간을 가져온다.
2. CatalogDto
@Data
public class CatalogDto implements Serializable {
    private String productId;
    private Integer qty;
    private Integer unitPrice;
    private Integer totalPrice;

    private String orderId;
    private String userId;
}3. ResponseCatalog
@Data
@JsonInclude(JsonInclude.Include.NON_NULL)
public class ResponseCatalog {

    private String productId;
    private String productName;
    private Integer unitPrice;
    private Integer stock;
    private Date createdAt;
}▶ Controller
    @GetMapping("/catalogs")
    public ResponseEntity<List<ResponseCatalog>> getCatalogs() {
        Iterable<CatalogEntity> catalogList = catalogService.getAllCatalogs();

        List<ResponseCatalog> result = new ArrayList<>();
        catalogList.forEach(v -> {
            result.add(new ModelMapper().map(v, ResponseCatalog.class));
        });

        return ResponseEntity.status(HttpStatus.OK).body(result);
}- 현재 서비스에 있는 모든 물품들의 정보를 담아 확인한다.
▶ Service 와 ServiceImpl
- 오로지 등록되어 있는 물건만 가져오는 것이 목적이기 때문에 별다른 서비스가 없다.
1. Service
public interface CatalogService {
    Iterable<CatalogEntity> getAllCatalogs();
}2. ServiceImpl
@Override
    public Iterable<CatalogEntity> getAllCatalogs() {
        return catalogRepository.findAll();
}▶ Repository
public interface CatalogRepository extends CrudRepository<CatalogEntity, Long> {
    CatalogEntity findByProductId(String productId);
}▶ 데이터 미리 넣기
- 우리는 등록된 물건을 가져오기만 하는 서비스를 만들었기 때문에 데이터를 넣는 과정이 없다. 때문에 데이터를 미리 넣어놓는 쿼리문을 작성해둔다
insert into catalog(product_id, product_name, stock, unit_price)
values ('CATALOG-001', 'Berlin', 100, 1500);
insert into catalog(product_id, product_name, stock, unit_price)
values ('CATALOG-002', 'Tokyo', 110, 1000);
insert into catalog(product_id, product_name, stock, unit_price)
values ('CATALOG-003', 'Stockholm', 120, 2000);
🦴 Order Microservice 제작
- 라이브러리는 동일하다
- yml 파일을 동일하게 설정하되 설정 정보 중 jpa.hibernate.ddl-auto를 update로 변경해준다.
- 주문을 담당하는 서비스이기 때문에 한 사용자의 주문 내용을 담는다고 생각하면 편하다.
▶ 전달 객체
1. OrderEntity
@Entity
@Data
@Table(name = "orders")
public class OrderEntity implements Serializable {

    @Id
    @GeneratedValue(strategy = GenerationType.IDENTITY)
    private Long id;

    @Column(nullable = false, length = 120, unique = true)
    private String productId;
    @Column(nullable = false)
    private Integer qty;
    @Column(nullable = false)
    private Integer unitPrice;
    @Column(nullable = false)
    private Integer totalPrice;

    @Column(nullable = false)
    private String userId;
    @Column(nullable = false, unique = true)
    private String orderId;

    @Column(nullable = false, updatable = false, insertable = false)
    @ColumnDefault(value = "CURRENT_TIMESTAMP")
    private LocalDateTime createdAt;
}2. OrderDto
@Data
public class OrderDto {

    private String productId;
    private Integer qty;
    private Integer unitPrice;
    private Integer totalPrice;

    private String orderId;
    private String userId;
}3. RequestOrder
@Data
@JsonInclude(JsonInclude.Include.NON_NULL)
public class RequestOrder {

    private String productId;
    private Integer qty;
    private Integer unitPrice;

}4. ResponseOrder
@Data
@JsonInclude(JsonInclude.Include.NON_NULL)
public class ResponseOrder {

    private String productId;
    private Integer qty;
    private Integer unitPrice;
    private Integer totalPrice;
    private LocalDateTime createdAt;

    private String orderId;

}▶ Controller
    @PostMapping("/{userId}/orders")
    public ResponseEntity<ResponseOrder> createOrder(@PathVariable("userId") String userId,
                                                    @RequestBody RequestOrder orderDetails) {
        ModelMapper mapper = new ModelMapper();
        mapper.getConfiguration().setMatchingStrategy(MatchingStrategies.STRICT);

        OrderDto orderDto = mapper.map(orderDetails, OrderDto.class);
        orderDto.setUserId(userId);
        OrderDto createdOrder = orderService.createOrder(orderDto);

        ResponseOrder responseOrder = mapper.map(createdOrder, ResponseOrder.class);

        return ResponseEntity.status(HttpStatus.CREATED).body(responseOrder);
    }

    @GetMapping("/{userId}/orders")
    public ResponseEntity<List<ResponseOrder>> getOrder(@PathVariable("userId") String userId) {
        Iterable<OrderEntity> orderList = orderService.getOrdersByUserId(userId);

        List<ResponseOrder> result = new ArrayList<>();
        orderList.forEach(v -> {
            result.add(new ModelMapper().map(v, ResponseOrder.class));
        });

        return ResponseEntity.status(HttpStatus.OK).body(result);
}- createOrder : 사용자의 주문을 받고 service를 통해 데이터를 저장하고 그 내용을 Response를 통해 추가적인 데이터와 함께 전달합니다
- getOrder : 해당 유저가 주문한 모든 데이터를 담아서 전달한다. UserService에서도 주문 정보를 가져오지만 User엔 사용자의 정보도 담겨있다.
▶ Service 와 ServiceImpl
1. Service
public interface OrderService extends Serializable {
    OrderDto createOrder(OrderDto orderDetails);

    OrderDto getOrderByOrderId(String orderId);

    Iterable<OrderEntity> getOrdersByUserId(String userId);

}2. ServiceImpl
    @Override
    public OrderDto createOrder(OrderDto orderDto) {
        orderDto.setOrderId(UUID.randomUUID().toString());
        orderDto.setTotalPrice(orderDto.getQty() * orderDto.getUnitPrice());

        ModelMapper mapper = new ModelMapper();
        // mapper 의 환경 설정정보 설정 ( 정확히 맞아야 한다 라는 뜻 )
        mapper.getConfiguration().setMatchingStrategy(MatchingStrategies.STRICT);
        OrderEntity orderEntity = mapper.map(orderDto, OrderEntity.class);

        orderRepository.save(orderEntity);

        OrderDto returnOrderDto = mapper.map(orderEntity, OrderDto.class);

        return returnOrderDto;
    }

    @Override
    public OrderDto getOrderByOrderId(String orderId) {
        OrderEntity orderEntity = orderRepository.findByOrderId(orderId);
        OrderDto orderDto = new ModelMapper().map(orderEntity, OrderDto.class);

        return orderDto;
    }

    @Override
    public Iterable<OrderEntity> getOrdersByUserId(String userId) {
        return orderRepository.findByUserId(userId);
}▶ Repository
public interface OrderRepository extends CrudRepository<OrderEntity, Long> {
    OrderEntity findByOrderId(String orderId);
    Iterable<OrderEntity> findByUserId(String userId);
}
🦴 모든 서비스 등록
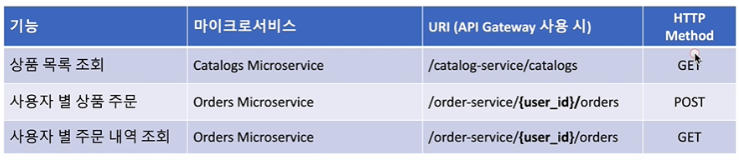
- 이제 완료된 User, Catalog, Order 에 대한 Microservice가 Gateway에 등록이 되어야 한다. Discovery서버에 등록이 되었기 때문에 lb를 통해 uri경로를 잡아주기만 하면 된다.
      routes:
        - id: user-service
          uri: lb://USER-SERVICE
          predicates:
            - Path=/user-service/**
        - id: catalog-service
          uri: lb://CATALOG-SERVICE
          predicates:
            - Path=/catalog-service/**
        - id: order-service
          uri: lb://ORDER-SERVICE
          predicates:
            - Path=/order-service/**

- 등록이 완료된것을 확인할 수 있다.
'MSA > MSA 강좌 - 이도원 강사님' 카테고리의 다른 글
| 👨👧👦6. Spring Cloud Config (0) | 2024.04.01 |
|---|---|
| 👨👧👦5. User Microservice 와 API Gateway - Security와 Filter 적용 (0) | 2024.03.30 |
| 👨👧👦 3. UserMicroservice ( 사용자 서비스 제작 ) - 1 (0) | 2024.03.28 |
| 👨👧👦 2. API Gateway Service (feat. Spring Cloud gateway) (0) | 2024.03.27 |
| 👨👧👦 1. ServiceDiscovery 등록 ( feat. Spring Cloud Netflix Eureka ) (1) | 2024.03.26 |
🦴 User Microservice 를 API Gateway에 등록
▶ 연동을 위해 application.yml 파일에 등록
routes:
  - id: user-service
    uri: lb://USER-SERVICE
    predicates:
      - Path=/user-service/**
🦴 User Microservice 기능 추가(사용자 조회와 정보, 주문 내역 조회)
- 전체 사용자를 조회 할땐 현재 서비스에 가입된 회원 전체를 나타낸다
- 사용자의 Id를 통해 회원을 보려고 한다면 회원의 정보와 회원이 주문한 내역까지 함께 나타낸다.
▶ 전달 객체
1. ResponseUser
@Data
@JsonInclude(JsonInclude.Include.NON_NULL)
public class ResponseUser {
    private String email;
    private String name;
    private String userId;
    private List<ResponseOrder> orders;
}- @JsonInclude(JsonInclude.Include.NON_NULL) : 불필요한 값인 null 인 데이터는 버리고 전달한다.
- List<ResponseOrder> 를 통해서 사용자가 주문한 정보도 가져올 수 있게 데이터를 추가했다.
2. ResponseOrder
@Data
public class ResponseOrder {
    private String productId;
    private Integer qty;
    private Integer unitPrice;
    private Integer totalPrice;
    private LocalDateTime createdAt;

    private String orderId;
}- 주문의 데이터중 어떤 데이터를 넣어줄지 ResponseOrder를 통해 설정했다.
3. UserDto
@Data
public class UserDto {
    private String email;
    private String name;
    private String pwd;
    private String userId;
    private Date createdAt;

    private String encryptedPwd;

    private List<ResponseOrder> orders = new ArrayList<>();
}- 데이터 전달 객체인 DTO에도 order를 넣어줄 수 있다.
▶ Controller
    @GetMapping("/users")
    public ResponseEntity<List<ResponseUser>> getUsers() {
        Iterable<UserEntity> userList = userService.getUserByAll();

        List<ResponseUser> result = new ArrayList<>();
        userList.forEach(v -> {
            result.add(new ModelMapper().map(v, ResponseUser.class));
        });

        return ResponseEntity.status(HttpStatus.OK).body(result);
    }

    @GetMapping("/users/{userId}")
    public ResponseEntity<ResponseUser> getUser(@PathVariable("userId")String userId) {
        UserDto user = userService.getUserByUserId(userId);

        ResponseUser returnValue = new ModelMapper().map(user, ResponseUser.class);

        return ResponseEntity.status(HttpStatus.OK).body(returnValue);
}- 처음 메소드는 저장되어 있는 사용자의 정보를 모두 나타내는 것이다
- JsonInclude로 user의 데이터에는 order의 정보가 없기 때문에 알아서null 인 값을 포함하지 않고 데이터를 내보낸다
- 두번쨰 메소드는 PathVariable을 통해 들어온 값을 확인해 해당 회원의 내용을 주문 정보까지 모두 나타낸다.
▶ Service 와 ServiceImpl
1. Service
public interface UserService {
    UserDto create(UserDto userDto);
    List<UserEntity> getUserByAll();
    UserDto getUserByUserId(String userId);
}
2. ServiceImpl
@Service
@RequiredArgsConstructor
public class UserServiceImpl implements UserService {

    private final UserRepository userRepository;
    private final BCryptPasswordEncoder passwordEncoder;

    ...
    @Override
    public List<UserEntity> getUserByAll() {
        return userRepository.findAll();
    }

    @Override
    public UserDto getUserByUserId(String userId) {
        UserEntity userEntity = userRepository.findByUserId(userId)
                .orElseThrow(() -> new UsernameNotFoundException("USer not found"));

        UserDto userDto = new ModelMapper().map(userEntity, UserDto.class);
        List<ResponseOrder> orderList = new ArrayList<>();
        userDto.setOrders(orderList);

        return userDto;
    }
}- getUserByAll() 은 사용자의 모든 데이터를 가져오기 때문에 List 형식으로 반환한다.
- getUserByUserId() 는 사용자의 정확한 Id로 데이터를 가져오고 현재는 존재하지 않지만 주문 내역을 가져와 저장하는 것을 보여준다.
▶ Repository
public interface UserRepository extends CrudRepository<UserEntity, Long> {
    UserEntity findByUserId(String userId);
}
▶ 결과
🦴 Catalog Microservice 제작
- 라이브러리는 User 와 동일합니다
- yml 파일을 User 와 동일하게 설정해줍니다
- 해당 서비스는 상품의 목록만 전달합니다. 이미 등록되어있다는 전제로 서비스가 진행됩니다.
▶ 전달 객체
1. CatalogEntity
@Data
@Entity
@Table(name = "catalog")
public class CatalogEntity implements Serializable {

    @Id
    @GeneratedValue(strategy = GenerationType.IDENTITY)
    private Long id;

    @Column(nullable = false, length = 120, unique = true)
    private String productId;
    @Column(nullable = false)
    private String productName;
    @Column(nullable = false)
    private Integer stock;
    @Column(nullable = false)
    private Integer unitPrice;

    @Column(nullable = false, updatable = false, insertable = false)
    @ColumnDefault(value = "CURRENT_TIMESTAMP")
    private Date createdAt;

}- @ColumnDefault를 통해 H2 DB에서 현재시간을 가져온다.
2. CatalogDto
@Data
public class CatalogDto implements Serializable {
    private String productId;
    private Integer qty;
    private Integer unitPrice;
    private Integer totalPrice;

    private String orderId;
    private String userId;
}
3. ResponseCatalog
@Data
@JsonInclude(JsonInclude.Include.NON_NULL)
public class ResponseCatalog {

    private String productId;
    private String productName;
    private Integer unitPrice;
    private Integer stock;
    private Date createdAt;
}
▶ Controller
    @GetMapping("/catalogs")
    public ResponseEntity<List<ResponseCatalog>> getCatalogs() {
        Iterable<CatalogEntity> catalogList = catalogService.getAllCatalogs();

        List<ResponseCatalog> result = new ArrayList<>();
        catalogList.forEach(v -> {
            result.add(new ModelMapper().map(v, ResponseCatalog.class));
        });

        return ResponseEntity.status(HttpStatus.OK).body(result);
}- 현재 서비스에 있는 모든 물품들의 정보를 담아 확인한다.
▶ Service 와 ServiceImpl
- 오로지 등록되어 있는 물건만 가져오는 것이 목적이기 때문에 별다른 서비스가 없다.
1. Service
public interface CatalogService {
    Iterable<CatalogEntity> getAllCatalogs();
}
2. ServiceImpl
@Override
    public Iterable<CatalogEntity> getAllCatalogs() {
        return catalogRepository.findAll();
    }
▶ Repository
public interface CatalogRepository extends CrudRepository<CatalogEntity, Long> {
    CatalogEntity findByProductId(String productId);
}
▶ 데이터 미리 넣기
- 우리는 등록된 물건을 가져오기만 하는 서비스를 만들었기 때문에 데이터를 넣는 과정이 없다. 때문에 데이터를 미리 넣어놓는 쿼리문을 작성해둔다
insert into catalog(product_id, product_name, stock, unit_price)
values ('CATALOG-001', 'Berlin', 100, 1500);
insert into catalog(product_id, product_name, stock, unit_price)
values ('CATALOG-002', 'Tokyo', 110, 1000);
insert into catalog(product_id, product_name, stock, unit_price)
values ('CATALOG-003', 'Stockholm', 120, 2000);
🦴 Order Microservice 제작
- 라이브러리는 동일하다
- yml 파일을 동일하게 설정하되 설정 정보 중 jpa.hibernate.ddl-auto를 update로 변경해준다.
- 주문을 담당하는 서비스이기 때문에 한 사용자의 주문 내용을 담는다고 생각하면 편하다.
▶ 전달 객체
1. OrderEntity
@Entity
@Data
@Table(name = "orders")
public class OrderEntity implements Serializable {

    @Id
    @GeneratedValue(strategy = GenerationType.IDENTITY)
    private Long id;

    @Column(nullable = false, length = 120, unique = true)
    private String productId;
    @Column(nullable = false)
    private Integer qty;
    @Column(nullable = false)
    private Integer unitPrice;
    @Column(nullable = false)
    private Integer totalPrice;

    @Column(nullable = false)
    private String userId;
    @Column(nullable = false, unique = true)
    private String orderId;

    @Column(nullable = false, updatable = false, insertable = false)
    @ColumnDefault(value = "CURRENT_TIMESTAMP")
    private LocalDateTime createdAt;
}
2. OrderDto
@Data
public class OrderDto {

    private String productId;
    private Integer qty;
    private Integer unitPrice;
    private Integer totalPrice;

    private String orderId;
    private String userId;
}
3. RequestOrder
@Data
@JsonInclude(JsonInclude.Include.NON_NULL)
public class RequestOrder {

    private String productId;
    private Integer qty;
    private Integer unitPrice;

}
4. ResponseOrder
@Data
@JsonInclude(JsonInclude.Include.NON_NULL)
public class ResponseOrder {

    private String productId;
    private Integer qty;
    private Integer unitPrice;
    private Integer totalPrice;
    private LocalDateTime createdAt;

    private String orderId;

}
▶ Controller
    @PostMapping("/{userId}/orders")
    public ResponseEntity<ResponseOrder> createOrder(@PathVariable("userId") String userId,
                                                    @RequestBody RequestOrder orderDetails) {
        ModelMapper mapper = new ModelMapper();
        mapper.getConfiguration().setMatchingStrategy(MatchingStrategies.STRICT);

        OrderDto orderDto = mapper.map(orderDetails, OrderDto.class);
        orderDto.setUserId(userId);
        OrderDto createdOrder = orderService.createOrder(orderDto);

        ResponseOrder responseOrder = mapper.map(createdOrder, ResponseOrder.class);

        return ResponseEntity.status(HttpStatus.CREATED).body(responseOrder);
    }

    @GetMapping("/{userId}/orders")
    public ResponseEntity<List<ResponseOrder>> getOrder(@PathVariable("userId") String userId) {
        Iterable<OrderEntity> orderList = orderService.getOrdersByUserId(userId);

        List<ResponseOrder> result = new ArrayList<>();
        orderList.forEach(v -> {
            result.add(new ModelMapper().map(v, ResponseOrder.class));
        });

        return ResponseEntity.status(HttpStatus.OK).body(result);
}- createOrder : 사용자의 주문을 받고 service를 통해 데이터를 저장하고 그 내용을 Response를 통해 추가적인 데이터와 함께 전달합니다
- getOrder : 해당 유저가 주문한 모든 데이터를 담아서 전달한다. UserService에서도 주문 정보를 가져오지만 User엔 사용자의 정보도 담겨있다.
▶ Service 와 ServiceImpl
1. Service
public interface OrderService extends Serializable {
    OrderDto createOrder(OrderDto orderDetails);

    OrderDto getOrderByOrderId(String orderId);

    Iterable<OrderEntity> getOrdersByUserId(String userId);

}
2. ServiceImpl
    @Override
    public OrderDto createOrder(OrderDto orderDto) {
        orderDto.setOrderId(UUID.randomUUID().toString());
        orderDto.setTotalPrice(orderDto.getQty() * orderDto.getUnitPrice());

        ModelMapper mapper = new ModelMapper();
        // mapper 의 환경 설정정보 설정 ( 정확히 맞아야 한다 라는 뜻 )
        mapper.getConfiguration().setMatchingStrategy(MatchingStrategies.STRICT);
        OrderEntity orderEntity = mapper.map(orderDto, OrderEntity.class);

        orderRepository.save(orderEntity);

        OrderDto returnOrderDto = mapper.map(orderEntity, OrderDto.class);

        return returnOrderDto;
    }

    @Override
    public OrderDto getOrderByOrderId(String orderId) {
        OrderEntity orderEntity = orderRepository.findByOrderId(orderId);
        OrderDto orderDto = new ModelMapper().map(orderEntity, OrderDto.class);

        return orderDto;
    }

    @Override
    public Iterable<OrderEntity> getOrdersByUserId(String userId) {
        return orderRepository.findByUserId(userId);
    }
▶ Repository
public interface OrderRepository extends CrudRepository<OrderEntity, Long> {
    OrderEntity findByOrderId(String orderId);
    Iterable<OrderEntity> findByUserId(String userId);
}
🦴 모든 서비스 등록
- 이제 완료된 User, Catalog, Order 에 대한 Microservice가 Gateway에 등록이 되어야 한다. Discovery서버에 등록이 되었기 때문에 lb를 통해 uri경로를 잡아주기만 하면 된다.
      routes:
        - id: user-service
          uri: lb://USER-SERVICE
          predicates:
            - Path=/user-service/**
        - id: catalog-service
          uri: lb://CATALOG-SERVICE
          predicates:
            - Path=/catalog-service/**
        - id: order-service
          uri: lb://ORDER-SERVICE
          predicates:
            - Path=/order-service/**
- 등록이 완료된것을 확인할 수 있다.
'MSA > MSA 강좌 - 이도원 강사님' 카테고리의 다른 글
| 👨👧👦6. Spring Cloud Config (0) | 2024.04.01 |
|---|---|
| 👨👧👦5. User Microservice 와 API Gateway - Security와 Filter 적용 (0) | 2024.03.30 |
| 👨👧👦 3. UserMicroservice ( 사용자 서비스 제작 ) - 1 (0) | 2024.03.28 |
| 👨👧👦 2. API Gateway Service (feat. Spring Cloud gateway) (0) | 2024.03.27 |
| 👨👧👦 1. ServiceDiscovery 등록 ( feat. Spring Cloud Netflix Eureka ) (1) | 2024.03.26 |